| Dimensions | N/A |
|---|---|
| Color | Original, Sand, Amber, Shadow, Champagne, Classic, Black, Rust, Scrap, Coal |
| Height | Standard, Medium, High |
| Hole diameter | 35 mm |
- Teknisk data Tekniske dataTekniske data Technische Daten Technische gegevens Technical data Technical data Tekniset tiedot
- Asennussuositus
- Installasjonsråd
- Installation advice
- Installation advice
- Installationsempfehlung
- Installationsråd
- Monteringsråd
- 3D
- Dokument DokumentDokument Dokumentieren Document Document Document Asiakirja
- Maintenance tips
- Maintenance tips
- Pflegehinweise
- Tips vor onderhoud
- Underhåll
- Vedligeholdelse
- Vedlikeholdstips
- Ylläpitovinkkejä
- Architect
- Architect
- Architekt
- Arkitekt
- Arkitekt
- Arkitekt
- Arkkitehti
Installation advice
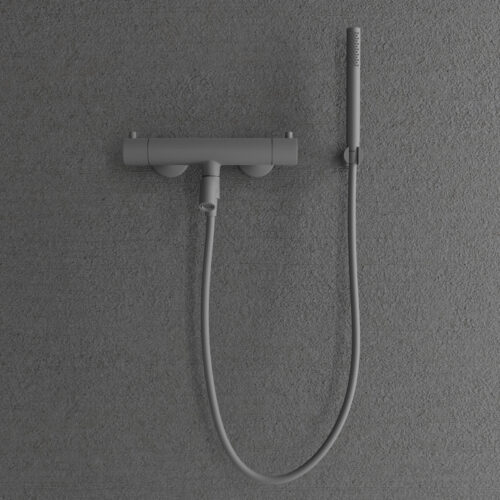
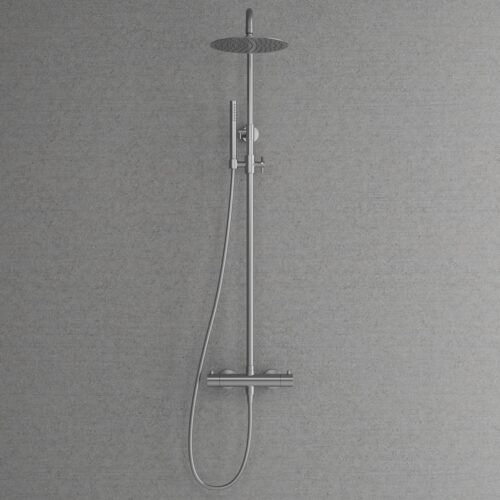
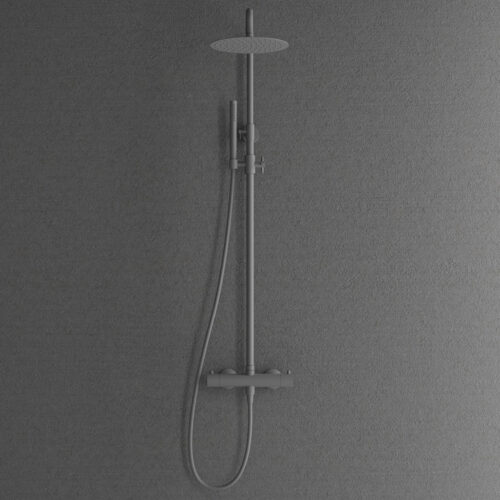
• The mixer is normally placed behind or to the side of the basin. Before installation check which mixer location suits the intended look of your bathroom. It is important that the distance between the mixer and the basin is correct. We recommend that the water flows in as close to the centre of the basin as possible.
• The mixer is normally placed behind or to the side of the basin. Before installation check which mixer location suits the intended look of your bathroom. It is important that the distance between the mixer and the basin is correct. We recommend that the water flows in as close to the centre of the basin as possible.
• The mixer is normally placed behind or to the side of the basin. Before installation check which mixer location suits the intended look of your bathroom. It is important that the distance between the mixer and the basin is correct. We recommend that the water flows in as close to the centre of the basin as possible.
• The mixer is normally placed behind or to the side of the basin. Before installation check which mixer location suits the intended look of your bathroom. It is important that the distance between the mixer and the basin is correct. We recommend that the water flows in as close to the centre of the basin as possible.
• The mixer is normally placed behind or to the side of the basin. Before installation check which mixer location suits the intended look of your bathroom. It is important that the distance between the mixer and the basin is correct. We recommend that the water flows in as close to the centre of the basin as possible.
• The mixer is normally placed behind or to the side of the basin. Before installation check which mixer location suits the intended look of your bathroom. It is important that the distance between the mixer and the basin is correct. We recommend that the water flows in as close to the centre of the basin as possible.
• The mixer is normally placed behind or to the side of the basin. Before installation check which mixer location suits the intended look of your bathroom. It is important that the distance between the mixer and the basin is correct. We recommend that the water flows in as close to the centre of the basin as possible.
• The mixer is normally placed behind or to the side of the basin. Before installation check which mixer location suits the intended look of your bathroom. It is important that the distance between the mixer and the basin is correct. We recommend that the water flows in as close to the centre of the basin as possible.
Product data sheet
Show Product data sheet for Voyage.pdf
Show Product data sheet for Voyage Medium.pdf
Show Product data sheet for Voyage High.pdf
Exploded drawing
Show Exploded drawing for Voyage.pdf
Show Exploded drawing for Voyage Medium.pdf
Show Exploded drawing for Voyage High.pdf
Maintenance tips
Original, Sand, Amber, Shadow
• Treatment with a stainless steel polish is recommended after installation to prevent marking with fingerprints, lime , grease and other contaminants. This should be done every three months. The brand we recommend is Würth.
• Avoid cleaning with materials or detergents that have an abrasive effect.
• In areas with lime-rich water it is recommended that you regularly remove lime deposits from the nozzle with a finger. For thorough lime removal: Remove the nozzle and place it in a solution of 3 parts warm water and 1 part vinegar (max. 12%) for 10 minutes to 2 hours (depending on extent of lime deposit). Then rinse in clean water and refit the nozzle to the mixer. See exploded drawing for location of nozzle.
Classic, Black
• Avoid cleaning with materials or detergents that have an abrasive effect.
• Clean the product with a little soap and a damp microfibre cloth, rinse with clean water and then dry with a dry microfibre cloth.
• In areas with lime-rich water it is recommended that you regularly remove lime deposits from the nozzle with a finger. For thorough lime removal: Remove the nozzle and place it in a solution of 3 parts warm water and 1 part vinegar (max. 12%) for 10 minutes to 2 hours (depending on extent of lime deposit). Then rinse in clean water and refit the nozzle to the mixer. See exploded drawing for location of nozzle.
Rust, Scrap, Coal
• In areas with lime-rich water it is recommended that you regularly remove lime deposits from the nozzle with a finger. For thorough lime removal: Remove the nozzle and place it in a solution of 3 parts warm water and 1 part vinegar (max. 12%) for 10 minutes to 2 hours (depending on extent of lime deposit). Then rinse in clean water and refit the nozzle to the mixer. See exploded drawing for location of nozzle.
• Avoid cleaning with materials or detergents that have an abrasive effect.
• The surface of products in the by Scandtap-series has been developed to be ultra matte. By polishing the material with Stainless Steel Care Spray, the properties of the PVD-colours are enhanced. Stains such as limescale are also prevented from sticking to the material. We recommend this treatment at least every three months. If you wish to preserve the industrial feel, no treatment is necessary.